Listing opportunities
Opportunity pages in the Turnkey CRM
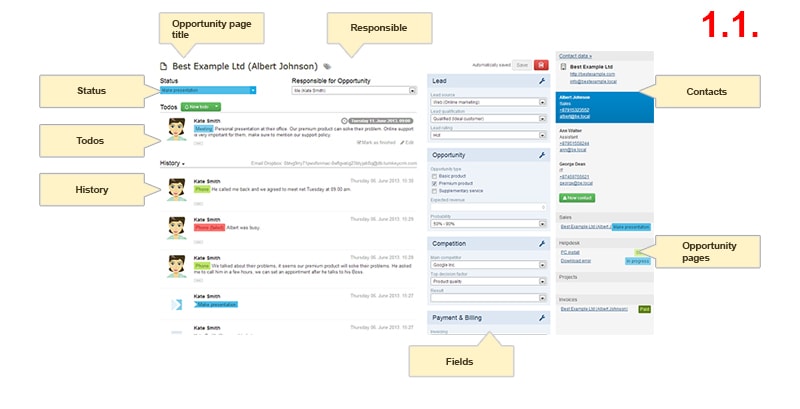
In our Turnkey CRM system we record the opportunity related information, todos andrelevant information on the opportunity pageswithin each module. In our system a single opportunity may have multiple opportunity pages.[1.1.]
In our Turnkey CRM we can list the opportunity pages by todos, responsible and statuses. By using filters we can segment the listed fields in accordance with our individual requirements.
Opportunity page with todos
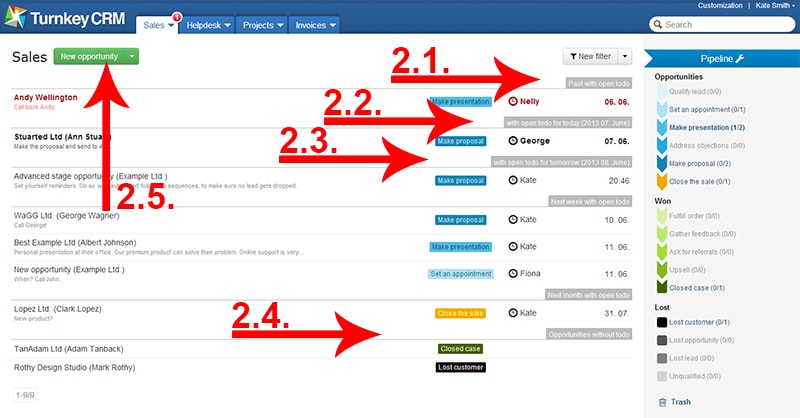
The list within the module starts with opportunity pages with an expired todo [2.1.] followed by opportunity pages with current todos [2.2.], and opportunity pages with due todos [2.3.]. The last ones are the opportunity pages without todos [2.4.].
We can add a new opportunity page by clicking on the [New …..] button [2.5.] on the capture located on the top of the list (which varies by module); later on we can upload the already created opportunity page for further editing by clicking on the name of the opportunity page indicated in the list.
For more information on various methods of adding a new opportunity page please go to Add new opportunity, and on settings of opportunity pages please go to Opportunity page.
Filter by responsible
We can choose a user from the dropdown box of the [New filter] button [3.1.], located at the top right corner of the opportunity page, as Responsible,whose opportunity pages we wish to exclusively display on the list, furthermore also those opportunity pages will be displayed in this list, where the responsible of the opportunity page is not the selected user, but it has a todo recorded for the given opportunity page.
If we select in the dropdown box of the [New filter] button, the second element (All) of the Responsiblelist, all opportunity pages will be displayed [3.2.]. This is the default filtering setting in all modules when uploading the opportunity page lists.

Filter by status
In the right side of the opportunity page we can see the Statuses,namely the consecutive steps of the respective module’s process, where we can move the opportunity pages to. There are 3+1 groups of opportunity pages, and the opportunity pages migrate in between these groups. As every enterprise is different, therefore both status groups and statuses within them can be customised in a way, that the Turnkey CRM shows the steps of our company’s business flow.For more information of customising statuses please go to Statuses.
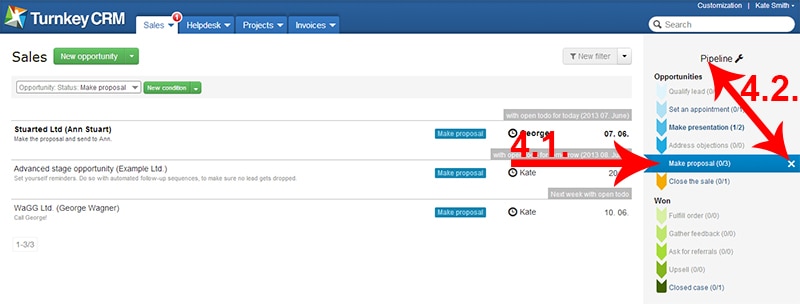
For a simple filtering please click on the required status [4.1.].As a result the list will only contain the opportunity pages, which are in the respective status. Statuses without an opportunity page cannot be selected; no filtering can be done with respect to these statuses.
Complex filtering is possible by Create a filer. For more information on this please go to Filters of the Turnkey CRM system!
By clicking on All statuses capture or on the Xsymbol behind the status selected during the filtering process [4.2.] all opportunity pages of the given module will be listed. This is the default filtering setting in each Modulewhen uploading the opportunity page lists.
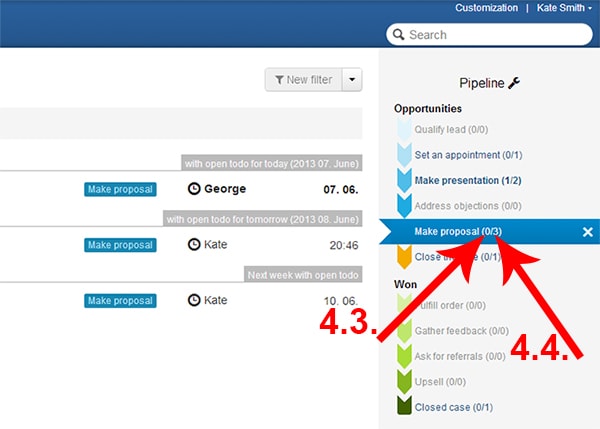
Behind the title of the statuses in brackets we can see also the number of opportunity pages with an expired todo [4.3.], furthermore the number of opportunity pages in the given status [4.4.].
Setting the listed fields
The listed fields can be set by using filters. For this we need to add new filters or we need to load already saved filters.
For more information on creating new filters and on the application of saved filters please go to Help for opportunity page filtering by fields, contact details and tags.
When editing a filter please put a tick in front of the Table view [5.1.], thus our opportunity page switches to table view. In this case the list displays the first 6 added fields [5.2.]. Every other added fieldwill only be displayed in the exported table.
The sequence of these fields can be amended as per as our requirements. For this it is sufficient to grab the respective grey-coloured field and to place it to the required location. As soon as we let go of the given field at the required location, the listed fields will be displayed in accordance with the new sequence, namely the given columns.
By clicking on the arrows located next to the titles of the fields, the Turnkey CRM lists the items as per as the field indicated at the beginning of the list [5.3.].
As the listed fields are being taken into consideration not only by the export but also by distribution,we can easily prepare a workbook, whereby the relevant data stored by the Turnkey CRM system are automatically updated. By this we can compile such individual reports and stats, which always display the current details and data, as they are automatically updated upon opening them.

„The (company) data indicated on the pictures used for the Help menu is non-existing data created only for testing purposes.”